Liftgate Glass (Remove and Replace)

FRT No: 10204002

Warning: To avoid personal injury, wear cut-resistant gloves when performing this operation.
Note: Use Dow Betaseal Express or an equivalent fast-curing glass adhesive to perform this procedure.

Special tool recommended for this procedure:

Supplier Part Number Description
Tesla 1064740-00-A Adhesive Scraper Tool

Removal

  1. Ensure that the vehicle is on a flat, stable surface.
    Note: The vehicle cannot be on a lift during this procedure.
  2. Ensure that all tires are inflated to their recommended pressures (refer to General Information > Technical Data > Tire pressures).
  3. Ensure that the panoramic roof is fully closed, if equipped.
  4. Ensure that the power liftgate is operational, if equipped.
  5. Protect all panels that are adjacent to the liftgate:
    • C-Pillar body panel
    • Fixed glass panel (with panoramic roof) / roof panel (without panoramic roof)
    • Quarter panels
    • Rear fascia
  6. Remove the upper liftgate finisher and the LH and RH side liftgate finishers (refer to procedure).
  7. Open all 4 windows. This prevents internal pressure from pushing out on the liftgate glass when it is installed.
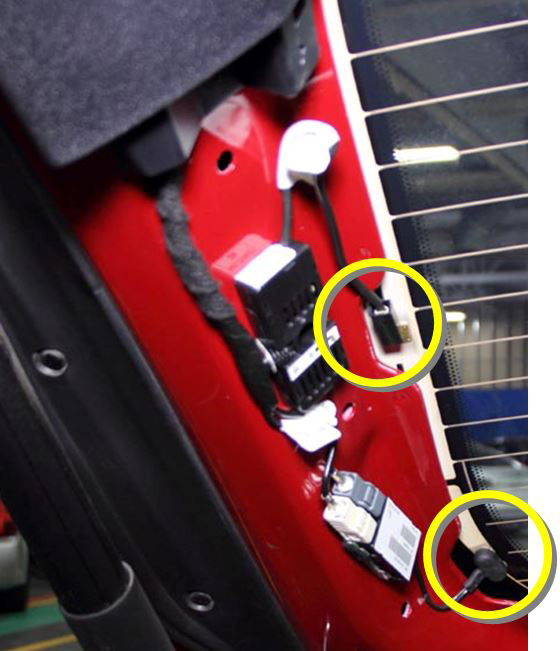
  8. Disconnect the harnesses (x2) that attach to the glass on the LH side of the liftgate. Tape the harnesses to the liftgate so that they are out of the way when the glass is removed in a later step.
    Caution: Take care not to damage component(s).
  9. Disconnect the harnesses (x2) that attach to the glass on the RH side of the liftgate. Tape the harnesses to the liftgate so that they are out of the way when the glass is removed in a later step.
    Caution: Take care not to damage component(s).
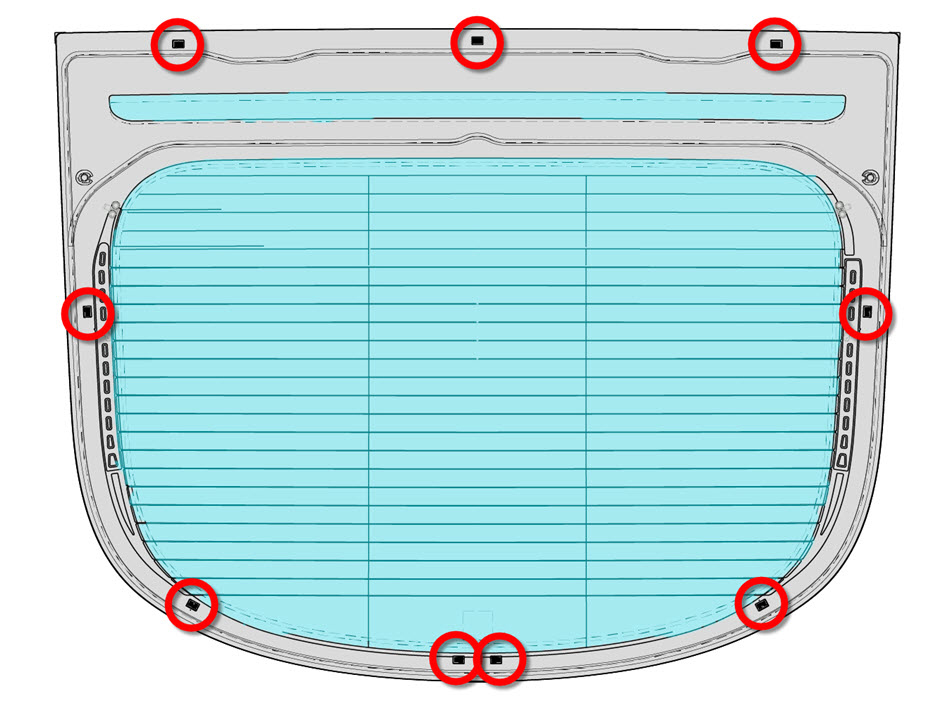
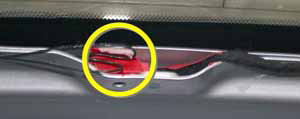
  10. Disconnect the harness that attaches to the center high mounted stop lamp (CHMSL). Tape the wires out of the way so that they are not damaged when the glass is removed in a later step.
  11. Cover the floor and side carpet panels inside the trunk with plastic. This prevents water damage in a later step.
    Warning: Read all documentation concerning the Equalizer Express360 tool before continuing this procedure.
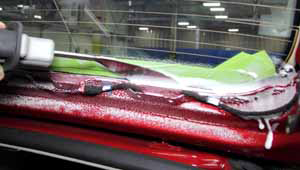
  12. Insert the cutting blade into the Equalizer Express360 tool.
    Caution: Only use the Equalizer Express360 to cut the 2 lines of urethane at the back of the liftgate glass (shown in green in the figure below). Do not use it to cut the urethane at the sides or bottom of the glass.
    1 Do not cut to left of this red line.
    2 Do not cut to right of this red line.
    Caution: While cutting, take care not to cut further than necessary to avoid damaging the liftgate or the rear roof panel.
    Caution: Before and during cutting, use water or alcohol to lubricate the urethane. If any other materials are used for lubrication, fully clean the affected area before applying more urethane.
  13. Position the tool at a 45 degree angle along the rightmost edge of the top line of urethane. Start cutting the urethane, moving the cutting tool from right to left while an assistant continues to spray the soap and water solution to lubricate the urethane.
    Warning: To avoid personal injury, eye protection must be worn when performing this operation.
    Caution: Do not cut past the left red lines shown in the figure in the previous step.
    Caution: Do not damage the CHMSL while cutting the bottom line of urethane.
  14. Repeat the previous step for the bottom line of urethane.
    Warning: Before proceeding, read all documentation for the Equalizer Python rotating cut-out wire.
  15. Use the Equalizer Python tool to cut the urethane around the sides and bottom of the liftgate.
  16. Secure suction cups onto the outside of the liftgate glass.
    Caution: Do not rely solely on the suction cups when moving the liftgate glass. Ensure that the glass is supported from the bottom while moving.
  17. Lift the glass off of the liftgate and set it gently onto a stand.
    Caution: Do not damage the CHMSL or the antennas.
  18. Mark the location of the CHMSL onto the glass, and then remove and inspect it. If the CHMSL is damaged, replace it.

Installation

  1. Use the adhesive scraper to remove the excess urethane from the body.
  2. Temporarily reconnect the CHMSL to the harness in the center of the liftgate and have an assistant depress the brake pedal. Ensure that the CHMSL lights up properly. If any of the LEDs have been damaged, replace the CHMSL.
  3. Disconnect the CHMSL and secure it to the liftgate glass using double-sided tape (3M 06397 or equivalent).
  4. Close the liftgate.
  5. Attach the spacers to the glass at the locations shown.
    Caution: To prevent degraded radio reception, ensure that the spacers do not contact any part of the antenna grid.
  6. Apply primer as directed by the adhesive manufacturer.
    Note: Check the primer and adhesive packaging for the appropriate working times for each product. Prepare the necessary tools and work environment so that the the glass can be installed within the specified working times.
    Note: This procedure requires approximately 2 tubes of urethane.
  7. Fully clean the urethane area.
  8. Cut the applicator tip on the urethane tube to the appropriate size.
  9. Apply the urethane to the liftgate glass. Be sure to follow the original pattern.
    Caution: To prevent degraded radio reception, do not allow adhesive to contact the radio antenna grid. Ensure that the adhesive is far enough away from the lower edges of the antenna grid that it will not touch the grid once the glass is installed.
  10. Install the rear liftgate glass, making sure that the gaps between the glass and the liftgate are even front to back and side to side. Evenly and progressively press the glass onto the spacers.
  11. Clean off any excess adhesive that was extruded from the joint.
    Warning: Do not drive the vehicle until the adhesive has cured. Refer to the adhesive packaging for the safe drive-away time.
  12. Reconnect all harness connections.
  13. Have an assistant use a hose to spray water along the edges of the liftgate glass. Ensure that no water leaks into the interior.
  14. Reinstall all components that were removed for access.