New drive units are shipped with temporary LH and RH mounts. Do not install these
mounts in the vehicle.
This section explains:
- How to transfer the acoustic padding, coolant hose, and LH mount from the old
drive unit to the new one
- How to transfer the temporary LH and RH mounts from the new drive unit to the
old one
-
Drain the coolant from the old drive unit.
-
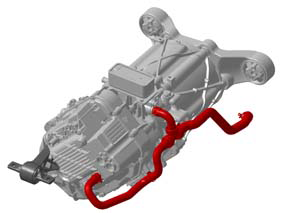
Remove the coolant hose from the rear of the old drive unit.
Note: This hose will be installed onto the new drive unit in a later step.
-
Remove the LH motor mount from the old drive unit.
Note: This mount will be installed onto the new drive unit in a later step.
-
Move the transmission jack to the gantry area and secure the black, red, and
yellow sling mounts:
Note: The blue sling mount is not used in this procedure.
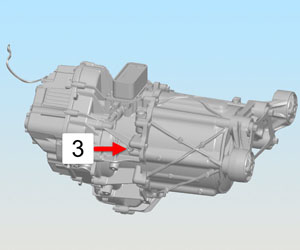
1 |
Black sling mount |
2 |
Red sling mount |
3 |
Yellow sling mount |
Note: When securing the yellow sling mount, use the hoist ring with the sleeve
spacer.
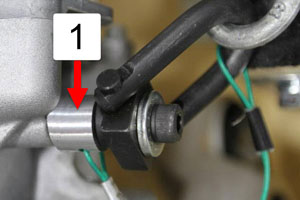
-
Secure the sling tool to the gantry.
-
Lift the drive unit off of the transmission jack.
-
Remove the acoustic padding from the old drive unit.
Note: This padding will be installed onto the new drive unit in a later
step.
-
Position the crate with the new drive unit underneath the gantry. Open the crate
and set the lid so the padding faces upwards.
-
Prepare another padded area next to the crate lid.
Caution: Do not proceed until there are 2 padded surfaces underneath the
gantry. These surfaces protect the drive units while the tilt lift extension is
being transferred from the old drive unit to the new one.
-
Lower the old drive unit onto one of the padded surfaces.
-
With the new drive unit still inside the create, remove the top bolt that
secures the LH motor mount.
Note: This allows the tilt-lift extension to be secured to the new drive unit
without removing the LH mount.
-
Secure the tilt-lift extension to the new drive unit. Lift it out of the crate
and onto the other padded surface.
-
Remove the LH mount from the new drive unit. Install it onto the old drive unit,
but do not install the top bolt at this time.
-
Remove the RH mount from the new drive unit. Install it onto the old drive
unit.
-
Secure the tilt-lift extension to the old drive unit. Lift the drive unit into
the crate.
-
Install the top bolt that secures the LH mount to the old drive unit.
-
Secure the tilt-lift extension to the new drive unit. Lift the drive unit to a
working height.
-
Install the acoustic padding onto the new drive unit.
-
Place the new drive unit on the transmission jack and secure it with the strap.
Note: Have an assistant guide the drive unit so that the ridge on the base of the
drive unit fits into the fitting on the transmission jack
-
Release the tilt-lift extension.
-
Install the coolant hose onto the new drive unit.
-
Install the LH motor mount onto the new drive unit (torque 38 Nm).